Sunday, June 28, 2015

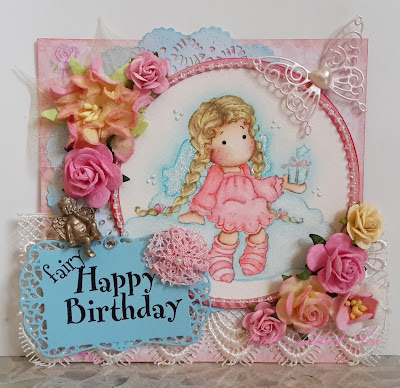
Fairy Happy Birthday

Hello friends! Welcome back to my blog. Today to share with you is a Fairy Happy Birthday card. I’ve used Magnolia “A little Gift Tilda” stamp from Sweet Christmas Dreams 2011 collection. I completed this fairy theme card in pink color.

Magnolia A Little Gift Tilda

Materials:
  • Magnolia “A Little Gift Tilda” stamp from Sweet Christmas Dreams 2011 collection
  • Crafter’s Companion Flower Fairies Friends “Almond Blossom” stamp set: For sentiments
  • Spellbinders Nestabilities “Timeless Rectangle” dies
  • Cheery Lynn Designs “English Tea Party Doily” die
  • Simon Says Stamp “Leanna Butterfly” die 
  • Paper flowers and skeleton leaves from I Am Roses
  • La’boom patterned paper
  • Ranger Stickles “Diamond”
  • Ranger Liquid Pearls “White Opal”
  • Embellishments: Lace, Heart Pearl, Knick Knackery’s Vintage Diamonds, and etc.

The Tilda image was stamped with Memento “Summer Sky” ink and colored with distress ink as usual. The cloud Tilda sitting on was hand drawn. The patterned paper and doily were distressed with “Worn Lipstick” and “Tumbled Glass” ink pads to match the coloring image.
Here is the close-up.


I entered this card to these challenge:

Thanks for stopping by. Have a fairy nice day!

Sunday, June 14, 2015

Thanks from the Heart Card & Until We Meet Again Art Journal Page

Hi everyone! Today I have 2 projects to share with you. I made both projects as farewell gifts to my colleague.

The first gift is “Thanks from the Heart” card. I wanted to make a card to say thank you to him since he helped me a lot in the past 3-4 year we had been working together. I think a bouquet is a perfect symbol for thankfulness. I folded a piece of paper and used Martha Stewart “Doily Lace” edge punch to make a cone shape for bouquet. I stamped thank words in different languages using Simon Says Stamp “From Us” clear stamp. Then, I filled in the cone with soft foam hearts to replace flowers in order to match with the theme. The sentiment was stamped with Lawn Fawn “Claire ABCs” clear stamp. Then, attached to card base, pattern paper, and tied the red ribbon to finish the card.


Another project is an art journal page. Everyone in the team was given a piece of paper to write memorial message to him. I think art journal style would fit this purpose. So I made my first art journal page as another gift for him.

Materials:
  • Decoupage napkin
  • Gesso
  • Distress paint “Tarnished Brass”
  • Distress ink “Vintage Photo”
  • Hero Arts “Old Letter Writing” block stamp
  • Inkadinkado “Big Butterfly” block stamp
  • Inkadinkado “Floral Wood Cut” block stamp
  • Tim Holtz Stamper Anonymous “Flutter” cling stamp
  • Stampendous “Timeless Tags” clear stamp
  • Making Memories “Great Escape” clear stamp
  • WPlus9 “Folk Art Alphabet” die

I started by sticking decoupage napkin to the paper. The gluing process was not perfect however I really loved the wrinkles that napkin created. Then I applied gesso and blended the color with distress paint “tarnished Brass” and distress ink “Vintage Photo”. I used many stamps to create vintage look. These are the old stamps that I stored for years. Since I was not a fan of vintage style, I never made any projects from those stamps before. But I’m glad I had them on the shelf so I could use them to create vintage background on this art journal page.


Then, I made a tag and envelop using a piece of paper and colored with the same colors as the background but using more of Vintage Photo. I will write a memorial message on the tag later. The stamp on the envelop was Tim Holts “Flutter” cling stamp. I don’t have any vintage alphabet items to match this project and I need to get it done by the weekend. My friend was so generous to lend me her WPlus9 Folk Art Alphabet die so I could finish the project in time.

And I completed my first art journal page.


I entered my art journal page to these challenges:


That’s all for today. Thanks for stopping by and see you later.

Related Posts Plugin for WordPress, Blogger...